Search This Blog

Showing posts with label Recipes. Show all posts

Saturday, January 26, 2013

Best Chicken Ever

I hope you had a great Saturday!

I'm still working on getting ready for our game night, but in the meantime, I needed to make lunch for a family we know.  I made the Best Chicken Ever, green beans, and this cake that I shared previously. 

Even if you are not the best cook ever, like my grandmother, it is nice if you have at least one meal that you know you can cook for guests and it will be fantastic.  These are some of my go to recipes.  My husband says these are the best green beans ever.  I got the recipe from Publix Aprons Simple Meals, and so you can easily get it here, on their website.  The only things I do differently are to make a much larger batch (as in, the recipe calls for 12 oz. of green beans and my husband and I can easily eat a pound by ourselves, as these are so good) and I add 2-3 times as much bacon as the recipe calls for--doesn't bacon make everything better?

Now for the chicken. 

I learned the real secret of this chicken about seven years ago from my fantastic friend, Holly.  She has a similar recipe that she made once while I was visiting.  The secret to good chicken (and many other things) is patience.  It really doesn't matter if you have the freshest herbs, or the best oil, or expensive chicken.  To be really good, you need to cook it on a very low temperature for a very looooonnnnnnggggg time.  I'm serious.  I cook mine for 11-12 hours at 200 degrees.  It should also be covered.  I happen to have a stoneware casserole dish and the rectangular lid/bowl from Pampered Chef that I use.  (I bought them years ago when I wasn't married and had money.)  You could use a much cheaper version of casserole dish and tin foil or something similar.  

To make this chicken, you will need:

1 whole chicken (or 2, or a turkey--it's versatile!)
Olive oil
Salt
Pepper (I used a VERY light sprinkling of Chipotle pepper instead of black)
Any herbs you like--I used tons of rosemary, some thyme, oregano, garlic powder, and minced onions this time.  I've also used basil and italian seasoning in the past.

Rinse the chicken and discard the bag of "extras."

Place in your dish (I always put mine in so the legs are on top) and pour olive oil on the chicken.  Use a bit more than a drizzle, but don't douse it in oil.  I try to just leave a thin film of oil on the surface of the chicken.  Then sprinkle on the salt, pepper, and your choice of herbs (you really can choose whatever you like).  I use enough herbs to cover the top of the chicken.  I think of it as a crust for the chicken.

Then, just put it in the oven on a low heat (like 200 degrees Fahrenheit) for at least 8 hours.  To get a nicely browned skin, take the lid off and increase the temperature (try 300) for the last 30 minutes to an hour of cooking.  

Every time I have served this, my guests loved it.  A few things I have learned, though, are these--if you cook two chickens at once, which is twice as much yumminess, it makes a ton of juice, and you want to be careful of overflowing your dish.  Also, it is best to serve the bird in the dish you cooked it in, because as soon as you touch it with a fork, it will fall to pieces.  No one has ever complained about the presentation.  They are too busy asking for seconds ;)

I hope you'll try this chicken.  It is worth the effort.  If you do try it, leave a comment and tell me how it went!

Wednesday, February 22, 2012

Muddy Buddies (My Version)

Have you heard of Muddy Buddies?  
I hadn't.  

My mother-in-law got the recipe off of a Chex cereal box long ago.  A few weeks before the Superbowl, my husband explained to me that Muddy Buddies were a tradition that I should keep.  He explained what they were, but I misunderstood his description.  They are supposed to be made with Chex or Crispix cereal.  I thought he said Chex Mix. 

I went to the store, and in the potato chip aisle, they had bags of Chex Mix in several different flavors buy one, get one free!  I picked the Caramel and Vanilla flavors.  When I got home, Tommy told me that I was just supposed to get the cereal.  So, we had Muddy Buddies with a twist.

The recipe for Muddy Buddies is HERE.  Try it, really.  Instead of the 9 cups of Chex cereal, I used 8 cups of Chex Mix.  I followed the rest of the recipe.  Tommy said he prefers the original, but I liked the added pretzels and such.  It kind of added a little salty flavor to the sweet.

I added the melted chocolate and stirred (this part took the longest).

Then, I put the powdered sugar in a gallon zip-top bag, and added the chocolate and cereal mixture.   Then, I just had to shake it up.  I had to add more sugar, but when it was done, I just poured it out on wax paper.  The recipe said to let the chocolate cool, or dry.  We were actually able to start snacking right away. 

I can tell you that these taste really good, and they really are ready in 15 minutes.  I started them after the game began, and they were ready before Half-time (I am a really last-minute person).  If you've never made them, this would be a great weekend snack or party food!


Enjoy!

Wednesday, December 28, 2011

Snowmen!


Aren't these little guys adorable?  Today, I'm going to show you how to make them--just in time for the cold weather and a New Year's Party!!!!


We had a fairly warm Christmas.  It finally cooled off yesterday, and today we started out in the 30's.  Welcome to Florida.  I made these little darlings for our 3rd Annual Ladies' Gathering that we had at my house the weekend before Christmas.  The party focused on growing closer together and building one another up.  My next post will be about that day.  But now, to make these snowmen while the weather is appropriate:

 Supplies:  Jet-Puffed Marshmallows, Rollos (with wrappers removed), Chocolate Candy Melts (or Milk Chocolate chips), toothpicks, and round chocolate cookies.


*If you have a piping bag, or a bag for decorating candy, those work best.  If you do not, a plastic sandwich bag will work, too.  Just don't squeeze it too hard.  
*I use the chocolate Oreo cookies, but any round chocolate cookie would work.  I think the Grasshopper cookies would be great for this, but not everyone in my family appreciates the combination of mint and chocolate...
*For the toothpicks, You will want to cut your toothpicks in thirds (I used kitchen shears for this) and use the two end pieces.  I threw the middles away.  Last year, I only had natural wood color toothpicks, and I dyed them orange with food coloring.  It worked quite well.  This year, however, my husband went to buy me some toothpicks, and the only ones the store had were already colored.  Just use what you have!


1.  Cover your workspace with wax paper, and pick out your marshmallows.  Something I learned the hard way--try to pick out the marshmallows that are not as smushed from being in the bag.  they need to be as flat and level as possible so they will stand up.  I had about 30 Oreos, so I needed 30 marshmallows and 30 Rollos (unwrapped).  


2.  Melt your chocolate.  Put some in a decorating bag or sandwich bag and heat them in the microwave.  There are directions for this on the bag of candy melts.  If you use chocolate chips instead, make sure you heat on 40% power.  Heat for 1 minute, and knead the bag.  If the chocolate isn't fully melted, keep heating and kneading at 30 second intervals.  Clip off the tip of the decorating bag (or corner of the sandwich bag) to allow a small amount of chocolate to come out.  The hole should be about 1/8 inch in diameter.


3.  Assemble your hats.  Squeeze a mound of chocolate onto the middle of an Oreo, and then stick a Rollo in the chocolate. Voila!  Your very own chocolate top hat!


*Make sure you are generous with your melted chocolate.  It is the glue that holds everything together.  Also, make sure that you allow for time for the chocolate to harden before you handle the pieces.  By the time I had assembled 30 hats, the first ones I had done were ready for the next step.


4.  Use an even more generous amount of chocolate on top of each marshmallow, and place a hat on top of each.


*If the chocolate doesn't squeeze out as well as you would like, try reheating it for 30 seconds (at 40% power) and see if that helps.
My assembly line.  

5.  After allowing time for the chocolate "glue" to harden, hold each snowman by the cookie (not the Rollo, it will melt on your hands) and pipe 2 eyes and little dots for the mouths.  


*Making sure that the chocolate is warm helps to make the eyes and mouths go better.  
*Holding the piping bag to the side and making the dots with a sideways motion seemed to work better than up-and-down.
*Keeping the tip of the bag clean makes for a better finished product.  If it starts to get chocolate stuck to the outside of it, just  wipe the tip with a napkin or paper towel.


6.  Add the noses.  

Enjoy!!!!!

These snowmen are so easy to make.  As long as an adult did the piping, you could easily allow children to help assemble these little guys.  You could make them a day or two ahead if you needed to, although the Oreos get soft.  These have been a hit with everyone that has seen them.  I serve them at our Christmas party, but then I have leftovers, so I usually wrap them individually and deliver them to co-workers and others, and they love them.  

I hope you'll try these!  They're really easy and have a big impact on your dessert table.

Happy New Year!

Tuesday, November 15, 2011

Anyone Can Make Faux Fudge!

Are you getting ready for all of that holiday baking?  Today, I am going to show you a recipe that I have been using for years.  It is quick, easy, and versatile.   No candy thermometer necessary! 

I was reading a Family Circle magazine and came across this reader tip:
So easy, right?

I thought I could do it, but I also thought I could do better.  This is how I make my "Faux Fudge."

The base recipe has a bag of chocolate chips, a can of frosting, 1-2 cups of marshmallows, and 1 tablespoon of butter.  Of course, the nuts are optional.  (I didn't use the whole bag.)
To start, use a non-stick pan and a spatula.  I love the silicon ones, because they don't melt.  I have a whole collection, and I use them for everything.  
 On medium heat, melt the butter in the bottom of your pan.  I use the butter to help with melting the marshmallows, so you don't need a lot.
Once the butter is melted, stir in your marshmallows.  If you don't think there are enough in the pan, you can always add more.  I used about 2 cups.  One of the best things about this recipe is its versatility and forgiving nature, so if you add more of something, it just makes it better.
Once the marshmallows have melted, you have to be more careful with your stirring and melting.  Stir in a can of cake icing.  It will melt and mix with the marshmallows very easily and quickly. 
Next, you will add the chips.  The chips do not melt as easily as the icing does, and you will have to stir a lot more.  Once you start adding the chocolate, if you don't stir enough, the mixture can get too hot and it will burn.  (After many times of doing this, I can tell you, you can smell it burning before the fudge will taste burnt.  IF it starts to smell burned, take the pan off the heat for a minute and stir, stir, stir--then put it back on the burner and keep stirring and melting.  Everything will be fine.)
The fudge will change consistency from stiff and lumpy to smooth very quickly.  When the mixture is melted and smooth, remove it from the heat and pour it into a greased baking dish.  You don't have to grease the pan, but it works much better.  Also, I have tried lining the dish with wax paper beforehand.  I don't recommend that, as the fudge just sticks to the paper. 
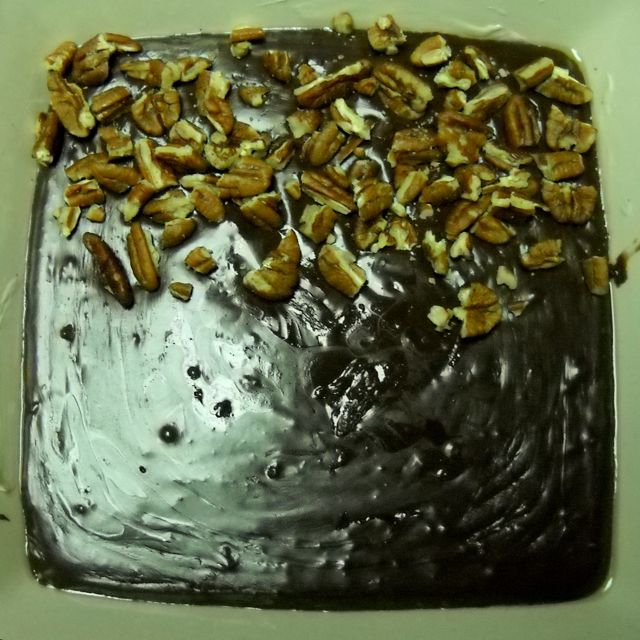
If you want to top the fudge with nuts, do it right after you pour it in the baking dish.  If you wait five minutes, the nuts will not stick as well.  I made this fudge to take on a picnic, and I wasn't sure if everyone liked nuts, so I only covered half of the fudge.
Put the fudge in the refrigerator for at least two hours.  I usually leave mine in overnight.  

For cutting:  I have found that it is a lot easier to cut if you take the fudge out of the refrigerator a few hours before you serve it.  If it is room temperature, you can cut it with a butter knife.  If it is cold, you will have to work much harder.

Now, let's talk about ways that I have changed this recipe.  The original suggested peanut butter chips.  I love peanut butter and chocolate, and I tried it.  I liked it.  Chips are expensive.  Eventually, I just started stirring about 1/2 to 3/4 of a cup of peanut butter in with the can of icing.  It works the same way, and is  cheaper.  

When Tommy and I first started dating, I wanted to make him something special for Valentine's Day.  He loves coffee, so I experimented with espresso flavored fudge.  I don't like coffee, but I like this.  I had  to make several attempts, but I finally got it right.  I went to Starbucks and bought a shot of espresso.  Stir the prepared espresso into the fudge after the chips begin to melt.  This one is a little bit more tricky than the rest.  If you add more than one shot, the fudge won't harden.  Also, the coffee will burn more easily than the chocolate, so you definitely want to stir it in last.  

Other things I have added are almond, peppermint, or orange extract.  Just use teaspoon or so, and stir it in just before you remove it from the heat.  Any extract/flavoring would work.  I have also tried mixing butterscotch chips in with the chocolate.  While I have not tried this one, I think that Andes Mints would be a great addition here!

Thanks to Lynette for helping me embark on this fudgy adventure!  

I'd love to hear from you!