This time, you will need cardstock, photo corners (also called photo splits), and a paper cutter. I also find the matting paper helpful.
Begin by choosing a piece of cardstock and cutting it in half. Then, trace the outline of your acetate onto one piece. You should center it from side to side, and keep it at one end.
Next, make marks about 1/2 inch from the edge of the acetate. It may be easier to just draw a second rectangle inside the first one. I have tried it both ways, and the rectangle method, also pictured below, worked better for me.
Then, use a paper cutter or scissors to cut out the inner rectangle.
Once you have a "window" cut into your paper, trace the cut out rectangle onto the uncut piece. Then, trim the second rectangle.
Then, line up both rectangles and trim one end of the paper so you have an even border on all sides.
Put photo corners on each corner. Make sure to use the side of the paper with the pencil marks on it. That will become the inside and the marks will be hidden. Center your acetate over the window you just cut in one of the sheets of paper. If you drew the outer rectangle, this should be easy to line up.
Stick the acetate to the first set of photo corners and then apply a second set to the top of the acetate.
Adhere the second piece of cardstock (pencil side in) to the stack. Now, you should have a nice frame around your work. You can see the view from the front and the back.
You can make a simple hanger with ribbon and photo splits.
Cut two pieces of ribbon to length, and attach photo corners to the ends.
Peel of the backing and slide the ribbon between the two halves of the frame.


Tie the ribbon in a bow and you are done!
If you would rather make a card to send to someone, try one of these ideas.
Start with a piece of cardstock and fold it in half.
Place your stained glass design on the card where you would like it to appear.
If you have a smaller design, you will want to trim the edges off of the card, as shown.
Again, look at where you would like to place your picture, and then open the card to the inside front. If you lay the front of the card on your table, you will be looking at your card "backwards." Lay your acetate down where you would like it to appear on the front, and trace around it.

When you open the card, the image will be on the opposite side.
Once you have traced around the acetate, draw a second rectangle about a 1/3 of an inch inside the original box. Then, cut along the inside rectangle.
 If you do not have a paper cutter, or you cannot fit your paper easily within the dimensions of your cutter, you can use a pair of scissors.
Next, trace your folded card onto a matching piece of cardstock and cut it out. You will only need enough to cover the inside front of your card.
As with the frame, trace and cut a matching rectangle on the new piece of cardstock.
On the inside of your card, place photo corners and attach the stained glass design.
Next, apply photo corners on top of the acetate and in the corners of the card. Then, adhere the extra piece of cardstock that you just cut to finish it off.
To make your design stand out, cut a piece of white cardstock or photo matting paper to fit on the inside of your card. It looks nice if you leave a border of about 1/4 inch outside the white.
Use photo corners to stick your white paper inside.
You can make a second type of card by following the same instructions as you would for the frame--except you just don't cut off the excess paper. I did have to trim the width of mine, as the picture was small, but I left most of the length of the paper.
When you stick on the photo corners to put the top layer of paper on, put some extras on the sides, and an extra row of them at the bottom of your picture.
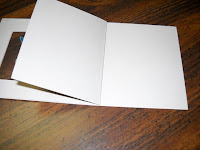
After you stick the front panel on, gently fold the bottom of the BACK panel up, making a slight crease. Then, fold it up all the way, making it flat on the table.
When you fold the flap back down, you will have a card that stands up to display your work.
You could add a message to the front of your cards, or just write on the inside.


love it!!
ReplyDelete