Search This Blog

Wednesday, November 30, 2011

A Baby Gift


A family at church is about to be blessed with their first child--a little girl.  We are so excited for them.   For her shower, I thought I would try out one of the ideas I saw on Pinterest.  {If you haven't heard of Pinterest, it is a site for finding/sharing great ideas.  I have a few invitations left on my account, if you want one, please email me :)}
I used buttons to embellish some onesies that I picked up at Wal-mart, and then I made some cute little skirts to go with them.  I originally saw THIS cute design on Pinterest.  You can see my version on the left.  I used pastel buttons for two reasons--this was for a girl, and Wal-mart was out of packages of primary colored buttons.  I did use a dark blue button for the head.

To make this, I arranged the buttons the way I wanted them, and then held one of them in place and put the others back on the table.  I used embroidery thread (DMC floss) to sew the buttons on.
You can use any type of thread.  I used the embroidery floss (this is the same thread that people use to make friendship bracelets) because it has six strands of thread together, and so it is much thicker.  You get very noticeable stitching without having to sew as much.
Just thread your needle, tie a good knot to start, and sew on your first button.  I like to make the X shape with my thread, but you could make yours parallel = if you wanted to.
Once I sewed the button on, I laid the other buttons back on the shirt to make sure that I was keeping the design I wanted.  Then I held the next one in place, picked up the other buttons and sewed on the second.  I just kept doing that until I got to the end.
After sewing on so many buttons, I found that it is easier to just keep sewing on the buttons with the same thread, rather than tying a knot after each button.
I used a backstitch with dark embroidery thread to make the little antennae.  Link for backstitch video (in case you need it--I promise, it's really easy.  If you can sew on a button, you can do this.)


The next onesie I made had a rainbow on it.  Yes, it's a rainbow.  The mother-to-be recognized it, but not everyone else has.  Take it for what it's worth.  I found this greeting card on Pinterest that had a button rainbow, and I figured if you could put it on a card, it would go on a shirt.  (That's what I keep telling you--take an idea and make it your own!)  I added pom-poms for clouds, which seems to help people identify the rainbow.  The sewing technique is the same for the buttons.  The hardest part of this one was sewing the pom-poms on.  You have to get your needle through the center of the ball so that the thread won't pull out.  It's not really that difficult, but it is harder than sewing on a button.

My third design was a candy cane.  The baby is due this month, and what baby doesn't need something cute for Christmas?


There you have it--three personalized onesies (or t-shirts) for someone special.  A nice gift without having to spend a fortune {and since I am looking for a job, I don't have a fortune:)}
I also made some little skirts to match.  This was my favorite part.  I wanted to keep them.  Really.  They are very simple, although you would probably want to use a sewing machine. 
I liked this skirt best.  Don't you want to make one now?


As this post is already rather long, I decided to try something new (for me).  I did make a tutorial for the skirts that I made, but I posted it HERE.  Please keep in mind that I write this blog with the idea that anyone can do the things that I post, even if they've never tried similar projects.  I wrote my tutorial in hopes that someone who has never sewn anything before could still follow it (although I don't know if I succeeded).

If you need a cute gift for a baby, these are great.  I hope you try them!

I love to hear from my readers, so let me know what you think!

Sunday, November 20, 2011

Happy Thanksgiving AND How to Make a Bow


Wouldn't you like a wreath like this one?                                            You can make one.  Yes, you.  I have two columns in my living/dining room, and I got enough supplies to make a wreath for each of them.  I bought the supplies several years ago, and never got around to making them.  I finally made them on Saturday, to hang at my mother-in-law's house for Thanksgiving.  Next year, they will already be made, and I can put them up in October.

I used a medium-sized grapevine wreath, a little scarecrow, 4.5 feet of wire ribbon, and some silk flowers in fall colors. I bought long stems of fall leaves, and then I took the short stems of leaves off of the long ones.  


First, I arranged the leaf stems where I thought I wanted them.  


I tried to think about a "cascade" type of arrangement.  I put the larger stems of leaves in the back, and the shorter ones toward the bottom of the circle, in the front.  I also put the lighter color leaves in the front, so that they were more noticeable. 


On the opposite side of the circle, I arranged two small bouquets of fall flowers, and put one slightly lower than the other.  I also positioned my scarecrow in front of the flowers.

At this point, look at your wreath.  Do you like the placement of your components?  If not, this is the time to shift them around.  If you do like the way your wreath looks, then it's time to secure your leaves and  flowers.


I like the idea of being able to redo these wreaths if I get tired of them, and sometimes a glue gun can be messy.  To secure the stems and scarecrow to the wreath, I used craft/beading wire.  I cut a long piece and wrapped one end around the leaf stems and a grapevine stem, and when it was tight, I cut the long tail off.  I used craft wire through the loops of the scarecrow's overall straps (in the back) and wired him on, too.
 Next, I added the bow.  My aunt showed me how to make a beautiful small bow, and I modified that technique for a large bow.  I made a video for you, showing you how to make the bow.  Watch below!

This is the bow that I made on the video.  If it doesn't look as perfect as you want it to, just keep rounding out the loops and straightening the tails.  These bows are quick and easy, and they look great.


I put craft wire through the back of the bow and then used the wire to secure the bow to the wreath where I wanted to place it.  
I used craft wire to make a hoop on the back of the wreath to hang it.

Here it is:


I hope you all have a great holiday and enjoy time with your families and loved ones!

Tuesday, November 15, 2011

Anyone Can Make Faux Fudge!

Are you getting ready for all of that holiday baking?  Today, I am going to show you a recipe that I have been using for years.  It is quick, easy, and versatile.   No candy thermometer necessary! 

I was reading a Family Circle magazine and came across this reader tip:
So easy, right?

I thought I could do it, but I also thought I could do better.  This is how I make my "Faux Fudge."

The base recipe has a bag of chocolate chips, a can of frosting, 1-2 cups of marshmallows, and 1 tablespoon of butter.  Of course, the nuts are optional.  (I didn't use the whole bag.)
To start, use a non-stick pan and a spatula.  I love the silicon ones, because they don't melt.  I have a whole collection, and I use them for everything.  
 On medium heat, melt the butter in the bottom of your pan.  I use the butter to help with melting the marshmallows, so you don't need a lot.
Once the butter is melted, stir in your marshmallows.  If you don't think there are enough in the pan, you can always add more.  I used about 2 cups.  One of the best things about this recipe is its versatility and forgiving nature, so if you add more of something, it just makes it better.
Once the marshmallows have melted, you have to be more careful with your stirring and melting.  Stir in a can of cake icing.  It will melt and mix with the marshmallows very easily and quickly. 
Next, you will add the chips.  The chips do not melt as easily as the icing does, and you will have to stir a lot more.  Once you start adding the chocolate, if you don't stir enough, the mixture can get too hot and it will burn.  (After many times of doing this, I can tell you, you can smell it burning before the fudge will taste burnt.  IF it starts to smell burned, take the pan off the heat for a minute and stir, stir, stir--then put it back on the burner and keep stirring and melting.  Everything will be fine.)
The fudge will change consistency from stiff and lumpy to smooth very quickly.  When the mixture is melted and smooth, remove it from the heat and pour it into a greased baking dish.  You don't have to grease the pan, but it works much better.  Also, I have tried lining the dish with wax paper beforehand.  I don't recommend that, as the fudge just sticks to the paper. 
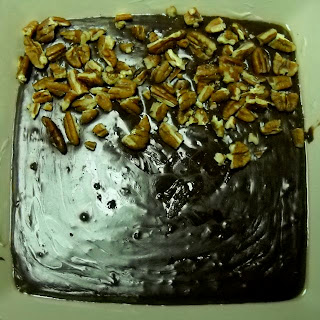
If you want to top the fudge with nuts, do it right after you pour it in the baking dish.  If you wait five minutes, the nuts will not stick as well.  I made this fudge to take on a picnic, and I wasn't sure if everyone liked nuts, so I only covered half of the fudge.
Put the fudge in the refrigerator for at least two hours.  I usually leave mine in overnight.  

For cutting:  I have found that it is a lot easier to cut if you take the fudge out of the refrigerator a few hours before you serve it.  If it is room temperature, you can cut it with a butter knife.  If it is cold, you will have to work much harder.

Now, let's talk about ways that I have changed this recipe.  The original suggested peanut butter chips.  I love peanut butter and chocolate, and I tried it.  I liked it.  Chips are expensive.  Eventually, I just started stirring about 1/2 to 3/4 of a cup of peanut butter in with the can of icing.  It works the same way, and is  cheaper.  

When Tommy and I first started dating, I wanted to make him something special for Valentine's Day.  He loves coffee, so I experimented with espresso flavored fudge.  I don't like coffee, but I like this.  I had  to make several attempts, but I finally got it right.  I went to Starbucks and bought a shot of espresso.  Stir the prepared espresso into the fudge after the chips begin to melt.  This one is a little bit more tricky than the rest.  If you add more than one shot, the fudge won't harden.  Also, the coffee will burn more easily than the chocolate, so you definitely want to stir it in last.  

Other things I have added are almond, peppermint, or orange extract.  Just use teaspoon or so, and stir it in just before you remove it from the heat.  Any extract/flavoring would work.  I have also tried mixing butterscotch chips in with the chocolate.  While I have not tried this one, I think that Andes Mints would be a great addition here!

Thanks to Lynette for helping me embark on this fudgy adventure!  

I'd love to hear from you!