The idea for these started off with cake pops, which I learned about from a lovely book by Bakerella, called Cake Pops. I decided to try them, and they were great. You can buy some overpriced ones at Starbucks if you really want to see some. There are recipes on the internet, too.
This is our take on cake pops:


Next, it is time to crumble the cake. The nice part of this is that it doesn't matter what your original cake looked like, because you are turning it into crumbs anyway. Take a section of the cake and break it in half and rub the two together. Some people have suggested using a food processor, but I just use my hands. At the end, you should have a bowl of fine crumbs.


The best part of this is possibly the peanut butter. You can use any brand you like.

Add 8 to 12 oz. (1 to 1 1/2 cups) of peanut butter to the cake crumbs. The amount is mostly according your taste. I mixed in about a cup and the batter was fine as far as consistency, but I didn't think it had enough peanut taste, and so I added some more.

To mix the batter, you can start with a spoon, but the only way to really do this is to use your hands.


Mush the crumbs and peanut butter together until it makes a stiff batter, like cookie dough.

You will need something to hold your little cake balls after you make them. I used tupperware, but cookie sheets or plates are fine. You will probably want something with a raised edge to keep the little cakes from rolling off when you move the pan.

Take some batter and roll it into a 1 inch ball.

Then, squeeze the middle of the ball to make a peanut shape. As you mold your batter, cracks will form. Try to smooth these out as best as you can. Small cracks aren't a problem, but deep ones will show through the candy coating.


Keep it up until you use up all your batter. I ended up with about 48 peanuts, although if you don't sample them while you're making them, you may have a few more!

Once your peanuts are chilled, they need to be coated with candy. You can buy Candy Melts to do this, but for white candy, I found that almond bark was much cheaper. I used the almond bark (which doesn't have almonds in it, by the way) for a base and then used some Wilton Candy Melts (which you can get at Michaels or sometimes Walmart) to tint the candy to the color I wanted.


I have a "Little Dipper" crock pot that I use to melt my candy. If you do not have one of these, you can use the microwave. (You could also make a double boiler by boiling water in a sauce pan and putting a glass mixing bowl on the top of the pot. Put the candy in the bowl and it will melt. Just be careful of the steam escaping around the bowl.)

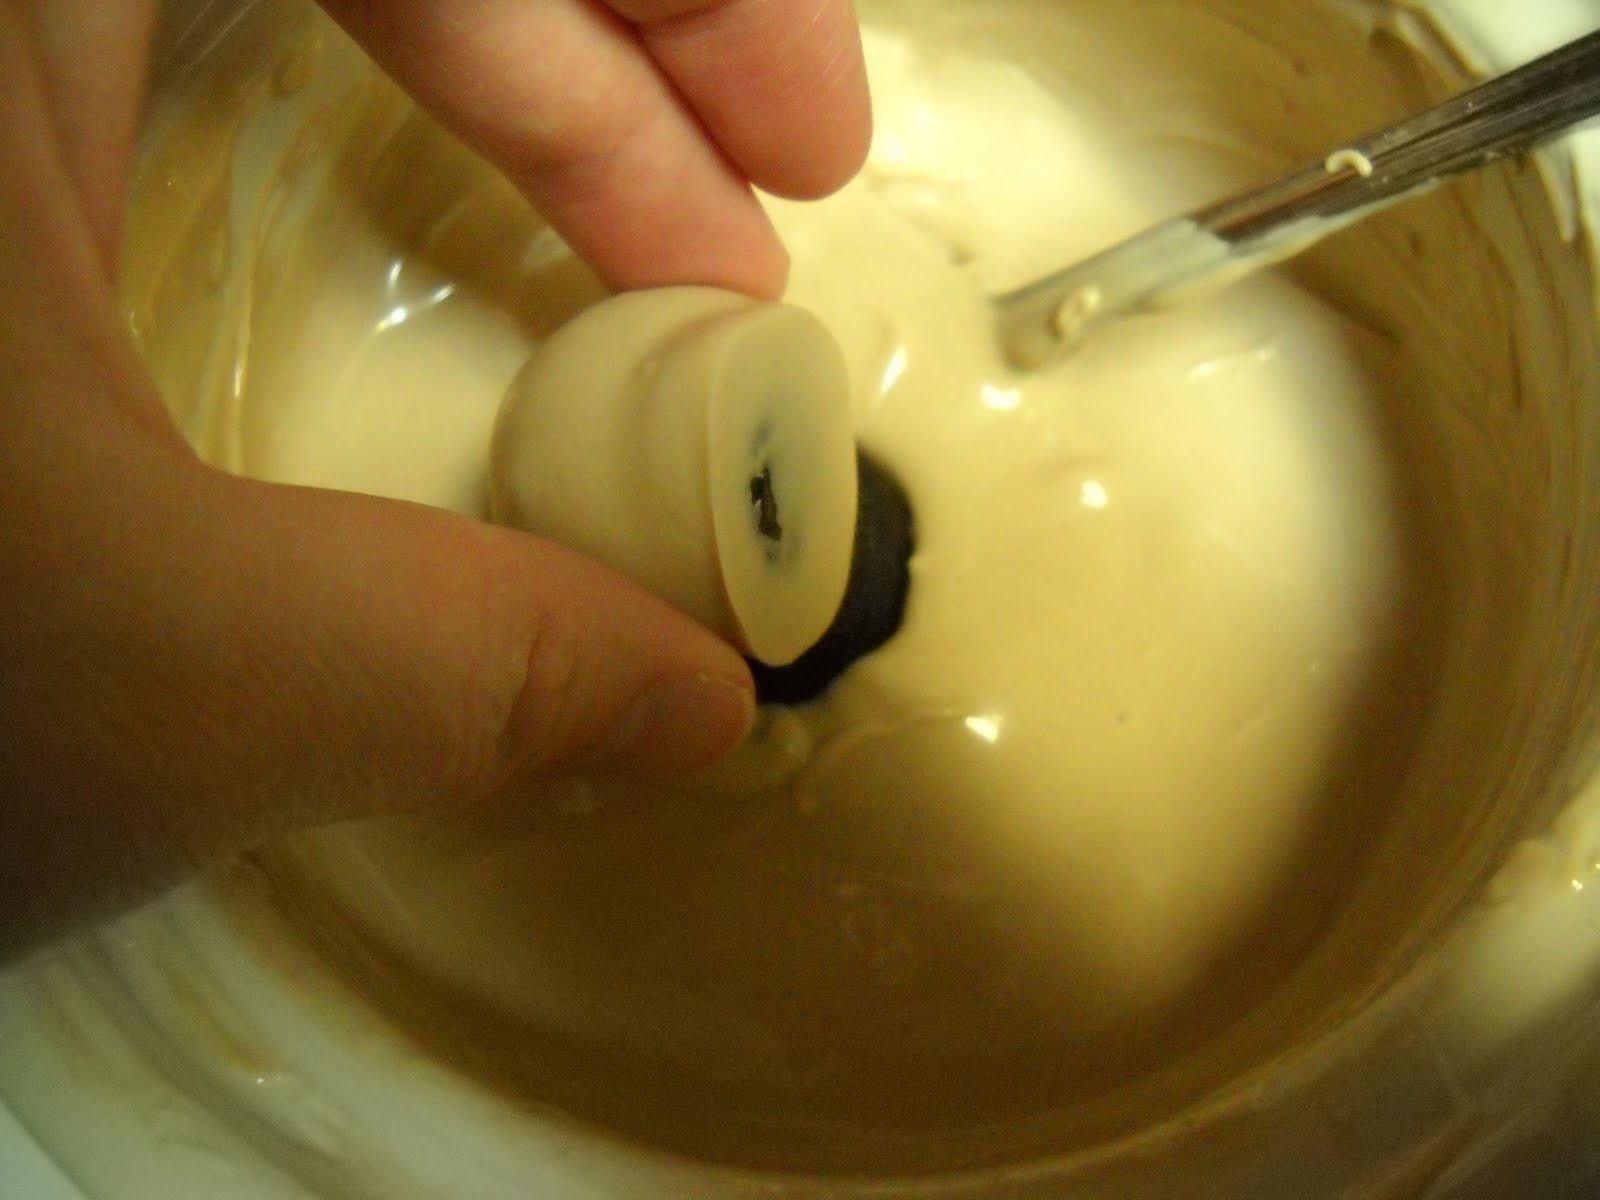
Once the white candy was melted, I added some of the chocolate. I finally ended up using 3 chocolate candy melts for each block of almond bark I used. The result should be a tan color. You will want your candy to be in a container that is 2-3 inches deep (or more) for dipping.


Notes: 1. Previously, I tried using tint for icing to color my candy instead of buying the colored candy melts. This does not work very well, which is why I bought the chocolate. 2. I started running out of the candy in the middle of my project, and when I mixed the new batch, it was a slightly different color. It didn't make a difference in the long run, but it bugged me. You might want to melt more candy than you think you will need to make sure than you don't have to make more in the middle. You can refrigerate any extra candy you have and use it for another project later. 3. Also, if you do use the crock pot, if you have it on for more than an hour, you will want to unplug it for a little while to prevent the candy from overheating.
Now, it is time to take your chilled peanuts and dip them in the candy. After several frustrating experiments, this is the best way I found to do this. One at a time, dip your peanut shapes just past halfway into the melted candy. Allow some of the candy to drip back into the pot.


Lay each peanut on wax or parchment paper so that the candy can harden.


Once the shell is hard, pick up each peanut by the candy coated side and dip the other side into the candy. When you put it back on the wax paper, make sure to lay the same side down on the paper so that the top will be smooth.


If your little cakes become too warm before you finish dipping them, they may break in half when you stick them in the candy. If this happens, enjoy the broken ones, and stick the unfinished cakes back in the refrigerator for about 20 minutes. Don't worry if a few of them break. Sometimes that just happens, even if they are chilled. I just eat those myself ;)
Last step: Decorating.
If you have candy decorating or icing bags, you can use one of those. If not, plastic sandwich bags will work--just be careful because the plastic bag may break if you squeeze it too hard.
Take some chocolate candy melts and put them in the bag. There are directions on the package for microwaving them to melt them.


After the candy is melted, cut a very small hole in the tip of the bag to allow the chocolate to come out. To let you know how small of a hole I used, the first one I cut was so small the chocolate couldn't even squeeze through, so I made the hole just a teeny bit bigger.
Squeeze the melted chocolate into horizontal and then vertical lines across the peanuts to make a grid. At first, I tried making individual lines, but that was very time consuming and it didn't seem to be as smooth as I wanted it. I tried moving faster and just making curves at the end of the line and my chocolate worked better. The connected lines didn't take away from the design.


Once the chocolate lines dry, they are ready to serve. They do not have to be refrigerated, but if you leave them in the sun, they will melt.
I put mine on serving dishes and sprinkled on some roasted peanuts as a garnish. They were worth the effort!


Enjoy!